TP安装redis
composer require predis/predis
需要去面板的php中安装fileinfo扩展
可视化工具
操作方法
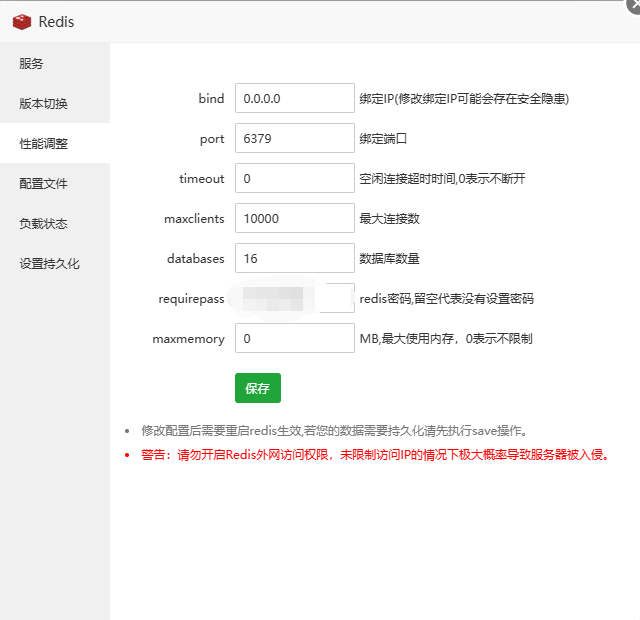
面板配置
其中bind 改为 0.0.0.0 为所有ip均可访问

加载依赖包
Predis依赖于PHP的自动加载功能,在需要的时候装载它的文件并符合PSR-4标准.
使用如下:
// 从 Predis 根目录加载.除非该文件就在 include_path 里
require 'Predis/Autoloader.php';

Predis\Autoloader::register();
连接 Redis
如果在连接时不加任何参数,默认会把 127.0.0.1 和 6379 作为默认的host 和 port 并且连接超时时间是 5 秒。如:
$client = new Predis\Client();
$client->set('foo', 'bar');
$value = $client->get('foo');
如果需要加连接参数,可以以 URI 或者以数组的形式。如:
// 数组形式
$client = new Predis\Client([
    'scheme' => 'tcp',
    'host'   => '10.0.0.1',
    'port'   => 6379,
]);

// URI 形式:
$client = new Predis\Client('tcp://10.0.0.1:6379');
当使用的是数组形式的时候。Predis自动转换到集群模式,并使用客户端的分片逻辑。
另外,参数也可以使用 URI 和数组混和,如:
$client = new Predis\Client([
    'tcp://10.0.0.1?alias=first-node',
    ['host' => '10.0.0.2', 'alias' => 'second-node'],
]);
Client 配置
Client 的更多配置参数可以通过第二个参数传进去:
$client = new \Predis\Client(
    $connection_parameters,
    ['profile' => '2.8', 'prefix' => 'sample:']
);
Redis 会给所需要的参数默认值,参数主要有:
- profile: 针对特定版本的配置,因为不同版本对同样操作可能有差异.
- prefix: 自动给要处理的 key 前面加上一个前缀.
- exceptions: Redis 出错时是否返回结果.
- connections: 客户端要使用的连接工厂.
- cluster: 集群中使用哪个后台 (predis, redis 或者客户端配置).
- replication: 主/从中使用哪个后台 (predis 或者 客户端配置).
- aggregate: 合并连接方式 (覆盖 cluster 和 replication).
合并连接
Predis 支持集群及主/从结构的连接。
默认情况下,使用客户端的分片逻辑,也可以使用 Redis 服务端提供的方式,即:redis集群.
在主/从结构中, Predis 支持一主多从的形式,并且在读取操作时连接从机,写操作时连接到主机。
主/从结构
客户端连接时可以进行主/从的配置。配置好后,当执行读取操作时会连接从机;执行写操作时会连接主机。实现读写分离。
下面是比较基础的主/从配置:
$parameters = ['tcp://10.0.0.1?alias=master', 'tcp://10.0.0.2?alias=slave-01'];
$options    = ['replication' => true];

$client = new Predis\Client($parameters, $options);
虽然 Predis 可以识别读/写操作,但 EVAL, EVALSHA 是两个特例。因为客户端不知道 LUA脚本里是否有写操作,所以通常这两个操作是在 Master 上执行。
虽然这是个默认的行为,但有些 Lua 脚本里如果不包括写操作,客户端还是可能会在 slaves 上执行。可以通过配置来指定。
$LUA_SCRIPT = "......some lua code......";
$parameters = ['tcp://10.0.0.1?alias=master', 'tcp://10.0.0.2?alias=slave-01'];
$options    = ['replication' => function () {
    // 强制指定为 slave 上执行,不切换到 master
    $strategy = new Predis\Replication\ReplicationStrategy();
    $strategy -> setScriptReadOnly($LUA_SCRIPT);

    return new Predis\Connection\Aggregate\MasterSlaveReplication($strategy);
}];

$client = new Predis\Client($parameters, $options);
$client -> eval($LUA_SCRIPT, 0);             // Sticks to slave using `eval`...
$client -> evalsha(sha1($LUA_SCRIPT), 0);    // ... and `evalsha`, too.
集群
通过传递简单的和配置就可以实现集群功能,并且是在客户端进行的分片。但如果想使用 redis-cluster 功能(Redis 3.0后的版本中可用)。可以如下配置:
$parameters = ['tcp://10.0.0.1', 'tcp://10.0.0.2'];
$options    = ['cluster' => 'redis'];

$client = new Predis\Client($parameters, $options);
当使用 redis-cluster 时,不用把集群中所有的节点都在参数中传递进去,只需要传少数几个就可以了。Predis会自动从某一台服务器上获取所有的哈希槽映射图。
- 注意: 目前 Predis 还不支持redis-cluster 中的 主/从 结构
命令管道
管道有利于提升大量命令要发送时的性能问题。它可以减小网络往返的延迟。比如有两个命令,数据需要:
- 发送命令到服务端
- 服务端执行命令
- 返回结构至客户端
每个操作都要执行该操作,管道的意思是可以将多个命令打包,一起发送至服务端,所有命令执行完后再将最终结果返回。
管道使用方式有两种,一种是通过回调函数;一种是通过接口:
// 回调的方式执行命令通道:
$responses = $client->pipeline(function ($pipe) {
    for ($i = 0; $i < 1000; $i++) {
        $pipe->set("key:$i", str_pad($i, 4, '0', 0));
        $pipe->get("key:$i");
    }
});

// 接口形式使用命令通道:
$responses = $client->pipeline()->set('foo', 'bar')->get('foo')->execute();
事务
Redis 可以使用 MULTI 和 EXEC 命令实现事务 功能。这里直接使用命令通道即可:
// 回调方式:
$responses = $client->transaction(function ($tx) {
    $tx->set('foo', 'bar');
    $tx->get('foo');
});

// 接口方式:
$responses = $client->transaction()->set('foo', 'bar')->get('foo')->execute();
我们可以使用 WATCH 和 UNWATCH 实现CAS (check and set)。如:
function zpop($client, $key)
{
    $element = null;
    $options = array(
        'cas'   => true,    // 使用 CAS 方式
        'watch' => $key,    // 要监视的 key
        'retry' => 3,       // 出错时重试次数
    );

    $client->transaction($options, function ($tx) use ($key, &$element) {
        @list($element) = $tx->zrange($key, 0, 0);

        if (isset($element)) {
            $tx->multi();   // 开启事务
            $tx->zrem($key, $element);
        }
    });

    return $element;
}

$client = new Predis\Client($single_server);
$zpopped = zpop($client, 'zset');
自定义命令
如果我们升级 Redis 到新的版本,而且有部分命令的处理方式有变更,但我们想使用之前的逻辑,这时我们可以自定义命令:
// 自定义一个类,继承 Predis\Command\Command:
class BrandNewRedisCommand extends Predis\Command\Command
{
    public function getId()
    {
        return 'NEWCMD';
    }
}

// 注册新的自定义命令:
$client = new Predis\Client();
$client->getProfile()->defineCommand('newcmd', 'BrandNewRedisCommand');

$response = $client->newcmd();
LUA 命令
Redis 2.6 后的版本可以使用
EVAL 和 EVALSHA 来执行LUA 脚本 。
Predis 支持简单的接口支持该功能。
LUA 脚本可以是在服务端的,也可以是通过参数传进去的。
默认情况下,使用 EVALSHA 也可以备用 EVAL :
// 定义一个脚本执行命令,继承 Predis\Command\ScriptCommand:
class ListPushRandomValue extends Predis\Command\ScriptCommand
{
    public function getKeysCount()
    {
        return 1;
    }

    public function getScript()
    {
        return <<
    }
}

// 注册新的命令:
$client = new Predis\Client();
$client->getProfile()->defineCommand('lpushrand', 'ListPushRandomValue');

$response = $client->lpushrand('random_values', $seed = mt_rand());
性能
本机测试
Predis 是纯 PHP 的扩展,所以它的性能可能有些不足。但在实际使用中应该是足够了。下面有一些测试数据,是使用 PHP5.5.6,Redis 2.8 :
21000 SET/秒 key 和 value 都使用 12 type 大小
21000 GET/秒
使用 _KEYS *_ 命令在 0.130 秒可以查询到 30000 个 key
和 Predis 相似的扩展有: phpredis,一个用 C 写的扩展。测试性能结果如下:
30100 SET/秒 key 和 value 都使用 12 type 大小
29400 GET/秒
使用 _KEYS *_ 命令在 0.035 秒可以查询到 30000 个 key
phpredis 看上去要快不少。但实际上相差的也不算太多,而且一个是C 写的,一个是纯 php 的扩展。并且上面的测试很简单,不足以定论。下面来看看类似实际生产环境中的测试。
外网环境测试
上面是一些连接本机的测试,下面连接远程服务器试试:
Predis:
3200 SET/秒 key 和 value 都使用 12 type 大小
3200 GET/秒
使用 _KEYS *_ 命令在 0.132 秒可以查询到 30000 个 key

phpredis:
3500 SET/秒 key 和 value 都使用 12 type 大小
3500 GET/秒
使用 _KEYS *_ 命令在 0.045 秒可以查询到 30000 个 key
可以看到两者效率相近了,这是因为网站的延迟会是性能非常重要的问题。Predis 可以使用命令通道,省去了不少时间。
最后选择
Predis 可以兼容各个版本的 Redis(目前支持 1.2 到2.8),并且可以通过自定义命令来兼容各版本的差异。
phpredis 在本机的优势是有的。
或者,可以两者都使用。
开启外网访问
redis默认只允许本地访问,要使redis可以远程访问可以修改redis.conf
注释掉bind 127.0.0.1可以使所有的ip访问redis
若是想指定多个ip访问,但并不是全部的ip访问,可以bind
在redis3.2之后,redis增加了protected-mode,在这个模式下,即使注释掉了bind 127.0.0.1,再访问redisd时候还是报错,如下
(error) DENIED Redis is running in protected mode because protected mode is enabled, no bind address was
specified, no authentication password is requested to clients. In this mode connections are only accepted from the
loopback interface. If you want to connect from external computers to Redis you may adopt one of the following
solutions: 1) Just disable protected mode sending the command 'CONFIG SET protected-mode no' from the loopback
interface by connecting to Redis from the same host the server is running, however MAKE SURE Redis is not publicly
accessible from internet if you do so. Use CONFIG REWRITE to make this change permanent. 2) Alternatively you can
just disable the protected mode by editing the Redis configuration file, and setting the protected mode option to
'no', and then restarting the server. 3) If you started the server manually just for testing, restart it with the '
--protected-mode no' option. 4) Setup a bind address or an authentication password. NOTE: You only need to do one of
the above things in order for the server to start accepting connections from the outside.
修改办法:protected-mode no
查看版本号:
入redis-3.2.3目录,使用命令:cd redis-3.2.3,然后输入命令 src/redis-cli
输入info命令,会输出一系列的关于redis的信息,找到redis_version,就是redis的版本信息了,到此就是用命令查看到了redis的版本信息了


